How to Create an Abandoned Cart? #
To create an abandoned cart, first access the admin panel and navigate through the side menu to the “Promotions” option.
In the submenu that appears, click on the second option, “Abandoned Cart Email”, and then click on “Rules”.

After the page loads, click on the blue “Add Rule” button located in the top right corner of the screen.
With this, you will have created the abandoned cart. However, it will need to be properly configured.
Below, I will explain each of the configuration settings separately.
General #
In the general settings, you can define a name for your abandoned cart rule, its status, priority over other abandoned carts, and the cancellation condition. The cancellation condition determines when the customer will no longer receive the abandoned cart email. For example, after clicking to open the email, the customer will no longer receive notifications for that abandoned cart. Keep in mind that, by default, the customer will not receive more than one notification for a second abandoned cart until they make a purchase on the site or until the abandoned cart expires, which takes around one month.
Stores and Customer Groups #
In this configuration, you first define which store view you want the abandoned cart rule to apply to. For example, suppose you have two store views: one for your website in Portuguese and another in English, and you want only the Portuguese site to have the abandoned cart functionality. In this case, in the store configuration, you will select only the Portuguese store view.
The same applies to the second setting, which refers to the “Customer Group.” Here, you must choose which customer groups should receive an abandoned cart email.
The default and recommended configuration is to select all options for both store view and customer group.

Conditions #
In the Conditions option, you can set specific conditions to limit the abandoned cart email rule. For example, suppose you want the abandoned cart email to be sent only to a specific ZIP code or when a cart contains a certain number of products. These are conditions that can be configured.
The default setting is not to add any conditions. If you wish to apply a condition to your abandoned cart emails, please contact our support team for assistance.

Scheduling #
In the Schedule option, you define the timing for the abandoned cart email to be sent to the customer and, consequently, how long it takes for a cart to be considered abandoned. Additionally, you can set custom templates for the abandoned cart email.
When an abandoned cart rule is created, the system automatically sets three scheduled email sends by default. The first email is sent after 3 minutes, meaning the cart is considered abandoned if products are added, but the customer does not complete the purchase and leaves the site within this timeframe. The other two emails follow the same process: the second is sent after 3 hours, and the third after 1 day.

When the rule is created, the platform sets a generic email template by default. It is important that you change it to the specific abandoned cart template.
You can also create a new schedule by clicking the blue ‘Create Record’ button located in the lower corner.
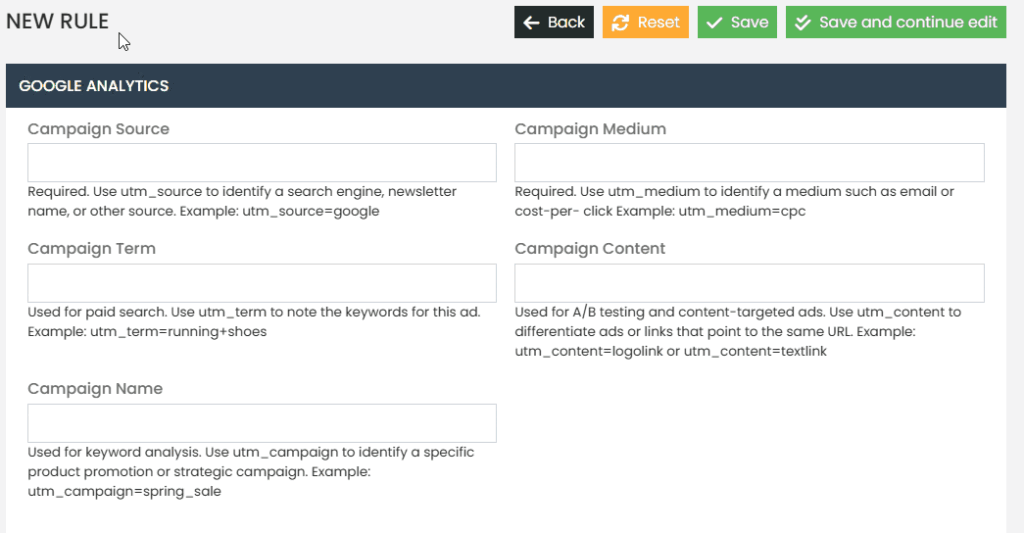
Google Analytics #
The configuration allows the module to send statistics directly from Google Analytics to the store’s email system. This includes metrics such as email open rates, clicks on cart recovery links, and conversions associated with these clicks.
The Campaign Source, Campaign Medium, and Campaign Name fields should be filled in according to the structure of the campaign you created in Google Analytics. This ensures that abandoned cart recovery data is correctly associated and tracked within Google Analytics, allowing for an accurate and effective analysis of your campaign performance.
By default, we leave this configuration with no fields filled in.
After completing the creation of the abandoned cart rule, don’t forget to save!

Test #
In the Test tab, you can send a test email to verify if you are correctly receiving the abandoned cart email and if the configuration is set up properly.
To manually trigger the email and perform the test, select the desired email and click the ‘Run’ button next to the customer’s name. An abandoned cart email will be sent to the selected customer.
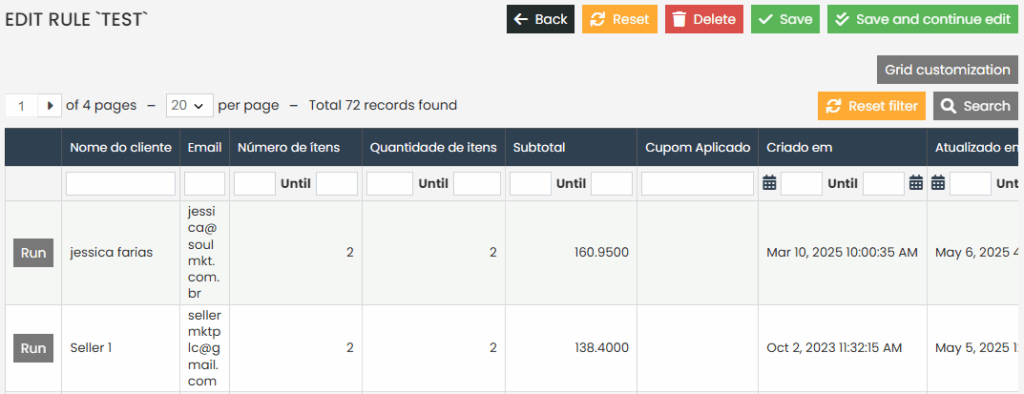
When a customer adds items to the cart and then abandons it without completing the purchase, their email address is added to the test grid.
Email Queue #
To check the Email Queue, access the side menu, go to Promotions – Abandoned Cart Emails, and in the new submenu that appears, select the Email Queue option.
In the Email Queue, you can check all emails scheduled for sending. In the ‘Scheduled At’ column, you can see when an abandoned cart email is scheduled to be sent. If the cart includes a discount coupon, you can also check which coupon is being offered.
The Email Queue is updated periodically. If you want to force an update, click the yellow ‘Update’ button in the upper corner to refresh the grid with the most recent abandoned carts.
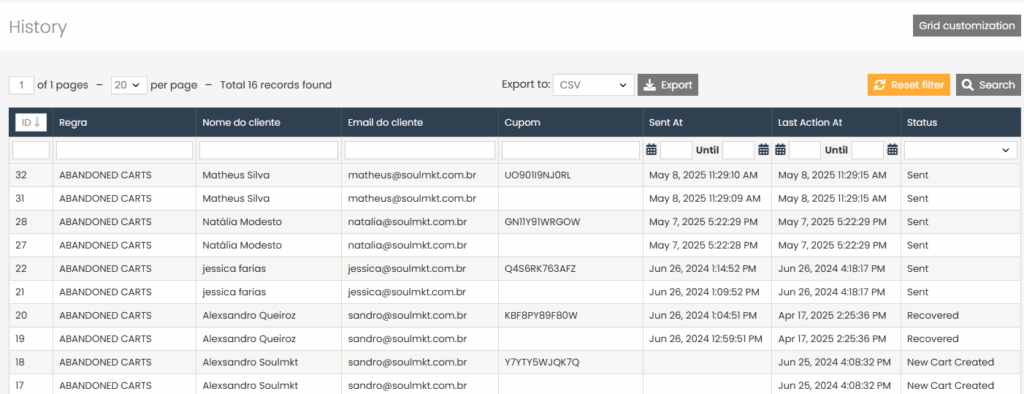
History #
To check the History tab, access the side menu, go to Promotions – Abandoned Cart Emails, and in the new submenu that appears, select the History option.
In the History tab, you can view all abandoned carts that have been sent. You will see the name of the abandoned cart rule created, the name of the customer who received the email, the customer’s email address, and, if the cart includes a discount coupon, you can view the coupon in the ‘Coupon’ column.
- You can also check when the email was sent and its status.
- If the status is ‘Recovered’, it means the customer received the email, returned to the abandoned cart, and completed the purchase, converting the abandoned cart into a sale.
- If the status is ‘Sent’, it means the email was successfully delivered to the customer.
This concludes the documentation on how to create an abandoned cart and all the options and settings related to this functionality. If you have any specific questions or need further clarification regarding the documentation itself, feel free to contact our support team. We are always available to assist you!